Appendix I - While we wait for serial port...
(temporary chapter)
Warning 1: This information is mostly for Windows' users;
Warning 2: Serial communication can be tricky, with hidden characters and configuration details. If you are not familiar with it, I suggest you start with a more friendly tutorial.
Red does not yet (october 2018) support serial port access. This may be disappointing if you plan to use Red with Arduino, IoT, ESP8266 and hardware in general. So, while we wait for serial port support, I list here a few tricks and tips I have found useful. They are mostly related to sending commands to Windows' cmd using call, but Linux users may also find interesting information here.
How Rebol does it. Probably Red will be the same:
Look at Rebol's documentation;
It seems to me that in Rebol you have to tell what your COM port is, create a "serial thing" (named "ser" in the example below) and configure it. Then, to send messages to serial, you insert your messages in this "thing", and to read what is received, you copy , pick or first this "thing".
Rebol []
System/ports/serial: [ com7 ]
ser: open/direct/no-wait serial://port1/9600/none/8/1
ser/rts-cts: false
view/title layout [
f: field 200
btn "TX" [insert ser f/text update ser]
t: area
rate 20 feel[engage: [append t/text copy ser show t]]
] "My Serial Test"

In this example, what is sent by the device is shown in the area, and when you press TX, whatever you wrote in the field will be sent to the device.
I tested it with an ESP8266 program that sends a timestamp every second, but also transmits back whatever it receives. The sketch also sends a ctrl-z (0x1A) every 10 messages. In case you are interested, here is the Arduino sketch:
long interval = 1000; //milliseconds between sending timestamps
long previousMillis = 0;
long count = 0;
void setup(){
Serial.begin(9600);
}
void loop()
{ // this first part "echoes" whatever is sent
// when characters arrive over the serial port...
if (Serial.available()) {
// ...wait a second and send them back.
delay(1000);
while (Serial.available() > 0) {
Serial.write(Serial.read());
}
}
// this second part sends a timestamp every interval
long currentMillis = millis();
if(currentMillis - previousMillis > interval) {
if (count > 10){
count = 0;
Serial.print("stop\x1A"); // string "stop" & ctrl-z
}
previousMillis = currentMillis;
Serial.print("Timestamp= ");
Serial.println(currentMillis);
count = count +1;
}
}
And now for tips and tricks to use Red as it is...
A function to get the COM ports available:
Sends the command mode to cmd and parses (not using parse) the returned value:
Red []
funcGetComPorts:
; Uses Windows' cmd to obtain the COM ports available
has[cmdOutput com-ports b c i] [
cmdOutput: "" ;this will hold the output from cmd as text
com-ports: [] ;this series will contain the COM ports
; now we send the command "mode" to Windows system (cmd)
; we store the system's return in "cmdOutput"
call/output "mode" cmdOutput
; now we remove all "-", otherwise they are "glued" to COM text
trim/with cmdOutput "-"
; now we split cmdOutput into a series
cmdOutput: split cmdOutput " "
; now we do some editing to get the ports in a nice format
foreach i cmdOutput [
b: copy/part i 3
if b = "COM" [
c: copy/part i 4
append com-ports c
]
]
return com-ports
]
probe funcGetComPorts
["COM7" "COM3"]
Configuring a serial port:
The complete cmd's command to configure a COM port would be:
mode COM7 BAUD=9600 PARITY=n DATA=8
So this would be a COM port configuring function:
Red []
SerialConfig: function [COMport baud parity datasize][
command: ""
command: rejoin [command "mode " COMport " BAUD=" baud
" PARITY=" parity " DATA=" datasize]
print command
call/shell form command
]
SerialConfig "COM7" "9600" "n" "8"
You can check if it works by typing mode on cmd before and after you run the script above. mode shows the current configuration of your ports.
Using ComPrinter.exe and SerialSend.exe :
These small executables (available for download here) may be accessed using a call command inside a Red script to send and receive data from a serial port. They are open source programs by Ted Burke (thanks!). These are great little programs that, with some creativity, may allow Red to do a lot!
The Red scripts examples here assume these executables are in the same folder as the script. Just paste a copy of them (the executables) there.
*look for the updated version you will find in the comments (bottom) of its page (direct download link).
From webpage: "ComPrinter is a console application (i.e. a command line program) that opens a serial port and displays incoming text characters in the console. It features several very useful options."
Options for ComPrinter.exe:
/devnum - Use this to specify a COM port. The default is the highest available com port, including ports >= 10. For example, to set COM7 use /devnum 7
/baudrate - Use this to specify the baud rate. Default is 2400 bits per second. For example, to set baud rate to 9600, use /baudrate 9600
/keystrokes - Use this to simulate a keystroke for each incoming character, for example to type text into an application.
/debug - Use this to display additional information when opening the COM port.
/quiet - Use this to supress the welcome message text and other information. Only text received via the COM port will be displayed.
The following options are only available in the updated version:
/charcount - Exit after a certain number of characters. For example, to exit after 6 characters, use /charcount 6
/timeout - Exit after a timeout – i.e. no data received for the specified number of milliseconds. For example, to exit after 2 seconds of no data, use /timeout 2000
/endchar - Exit when a certain character is received. For example, to exit when the letter ‘x’ is received, use /endchar x
/endhex - Exit when a certain hex byte is received. For example, to exit when the hex value 0xFF is received, use /endhex FF
Example:
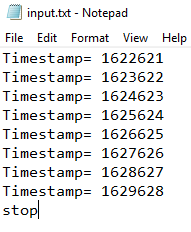
The example below sends what it receives in COM7 at baud 9600 to file "input.txt" until it receives a ctrl-z. It creates the file automatically or appends an existing file. The Arduino sketch above sends a ctrl-z every now and then, so your output may be longer or shorter:
Red[]
call/output form "ComPrinter.exe /devnum 7 /baudrate 9600 /endhex 1A" %"input.txt"
; ComPrinter.exe - the executable called
; /devnum 7 - selects COM7
; /baudrate 9600 - selects baud rate 9600
; /endhex 1A - stops ComPrinter when receives a ctrl-z (0x1A)
; %"input.txt" - the output file (remember the refinement of call?)
Content of input.txt file after running the script:
In case you want your Red script to do something else while cmd reads the serial port, you could use a cmd redirection (">") to send the output to a file. In this case, it seems to work only with call/shell:
Red[]
call/shell form "ComPrinter.exe /devnum 7 /baudrate 9600 /endhex 1A > input.txt"
print "This is printed immediately, while the input.txt file is still being created"
Unfortunately, you can't write to the serial port while cmd is receiving serial data. And by the way, Windows takes a few seconds to update the file, so if you open "input.txt" too quickly, it may be empty. Of course, it may also be empty because something went wrong...
From webpage: "SerialSend is a little command line application I created to send text strings via a serial port. I mainly use it to send information to microcontroller circuits via a USB-to-serial converter, so it’s designed to work well in that context."
The following command sends the characters “abc 123” via the highest available serial port at the default baud rate (38400 baud).
SerialSend.exe "abc 123"
Options for SerialSend.exe:
/devnum - Use this to specify a COM port. The default is the highest available com port, including ports >= 10. For example, to set COM7 use /devnum 7
/baudrate - Use this to specify the baud rate. Default is 38400 bits per second. For example, to set baud rate to 9600, use /baudrate 9600
/hex - Arbitrary bytes, including non-printable characters can be included in the string as hex values using the “/hex” command line option and the “\x” escape sequence in the specified text. For example, the following command sends the string “abc” followed by a line feed character (hex value 0x0A) – i.e. 4 bytes in total. use SerialSend.exe /hex "abc\x0A"
Example:
Red[]
call form {SerialSend.exe /devnum 7 /baudrate 9600 "abc 123"}
Example that sends variables and functions:
Red[]
myVariable: "Time now is: " ; a string
txt: rejoin [{"} myVariable now {"}] ; now returns time and date
command: form rejoin ["SerialSend.exe /devnum 7 /baudrate 115200 " txt]
print command ;just to help you see what will be sent to cmd
call command
Note that I increased the baudrate to 115200 in this second example. That is because I was having troubles at 9600 baud: for some reason, the message was being truncated to about a dozen characters. After many hours trying to isolate the bug (a null modem cable would have helped, but I don't have one at the moment), I gave up and just increased the speed, both in the Red script and in the Arduino sketch. That did not completely fix it, but I could send strings over 200 chars long, which is good enough for now.
A utility similar to SerialSend and ComPrinter, based on the work of Ted Burke, is comsniff - This utility not only prints what it receives on the cmd console, but also sends whatever you type, as you type, to the serial port. I had many problems trying to use it, but it's open source and worth a mention here.
Other useful (?) info in case you really don't want to use external executables:
Sending characters to a COM port: (not extensively tested)
I found useful information about sending characters to the serial port in Windows here. Basically, you may send data to the serial port using:
- echo hello > COM1
But this command also sends an extra space, a CR and a LF. Besides, it does not recognize higher port numbers (above 9?). You may choose to send a more universal command as this:
- set /p x="hello" <nul >\\.\COM22
Here is a function that uses the first command:
Red []
SerialSender: function [stringtosend COMport][
command: []
append command "e "
append command stringtosend
append command " > "
append command COMport
call/shell form command
]
SerialSender "hello world" "COM7"
You may send whole files to the serial port using copy yourfile.txt com1, or, for port numbers >= 10, copy yourfile.txt \\.\COM21
(Supposed to) redirect serial inputs to a file: (well, kind of tested but...)
These commands are supposed to send the input of a serial port to a file:
- COPY COM4 data.txt
- type com1: >> data.txt
I've had very bad results with that. Windows' cmd seems to start reading when it pleases and that may take tens of seconds, even minutes, or never at all. Anyway,if you are brave, don't forget to match the baud rate, parity and data size first!
By the way, to stop cmd from recording the data, the device should send a ctrl-z character. That would be Serial.write ("26") or Serial.print("<Stuff>\x1A") in Arduino. This seems to work with copy (when copy works at all) but not with type.
Terminals:
Here is a nice article about serial terminals.
Terminal - com port development tool - Lovely, very complete, but takes some getting used to.
PuTTY can be configured to work as a very nice serial terminal. It can save your session to a log file.
But to be honest, I mostly just use Arduino IDE's Serial Monitor.